PODGenie is a powerful tool that automates the creation of designs for Print-on-Demand (POD) products. With AI integration, users can generate thousands of unique designs in just a few simple steps. Version 2.0 introduces integration with both ChatGPT and Ideogram, the core tools for creating and customizing designs, while PODGenie serves as the automation platform to save time and effort.
2. System Requirements
- Operating System: Windows 10 or later.
- Software Requirements: .NET Core 8.0 or newer.
- Required Accounts:
- ChatGPT: A ChatGPT-4 account is needed to generate designs from prompts.
- Ideogram: Supports both free and paid Ideogram accounts. Paid accounts offer additional features like background removal and PNG downloads.
3. Installation Guide
Step 1: Download and install PODGenie.
- Visit the official website.
- Log in or create an account to receive your login credentials via email.
- Follow the on-screen instructions to install the software.
Step 2: Install .NET Core (if not already installed).
- When running PODGenie for the first time, if prompted to install .NET Core, click the provided link or download it from Microsoft .NET Core 8.0.
- Restart PODGenie after installation.
4. Main Interface
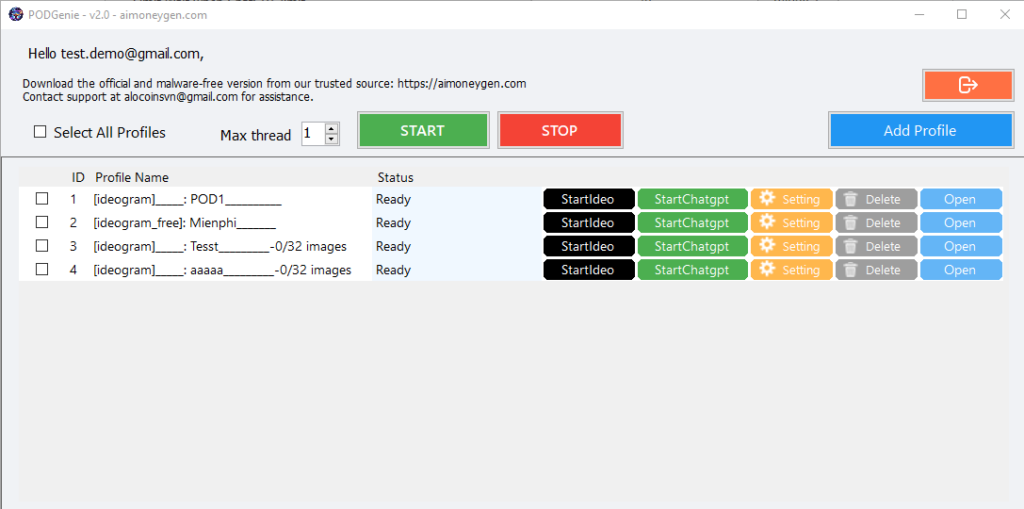
When you open PODGenie, you will see the main interface, which includes:
- Add Profile ChatGPT/Ideogram: Add a new design profile using ChatGPT or Ideogram.
- Settings: Customize design parameters.
- Start/Stop: Start or stop the design generation process.
- Open: Open the folder containing saved designs.
- Status: Displays activity status (Running, Ready, Stop).

5. Setting Up a ChatGPT Profile
Step 1: Create a design profile.
- Click “Add Profile ChatGPT.”
- Enter a profile name (e.g., “Tshirt_Design_2024”).
Step 2: Select a save folder.
- Click “Select Folder” to choose where generated images will be saved.
- Example:
D:\PODGenie\Designs.
Step 3: Configure prompts.
- Command Setup:
- Enter detailed prompts, such as:
- “Create a minimalist t-shirt design using green colors.”
- “Add winter elements like snowflakes and pine trees.”
- Enter detailed prompts, such as:
Step 4: Set wait times.
- Time Wait per Create Image: Set the delay between each creation (e.g., 60 seconds).
- Limit Wait when ChatGPT Limit: Set the cooldown period when ChatGPT usage limits are reached (e.g., 90 minutes).
6. Setting Up an Ideogram Profile
Step 1: Create a design profile using Ideogram.
- Click “Add Profile Ideogram.”
- Enter a profile name (e.g., “Poster_Design_Ideogram”).
Step 2: Select a save folder.
- Click “Select Folder” to choose where generated images will be saved.
Step 3: Log in to your Ideogram account.
- Click “Open” in the Ideogram profile configuration.
- Log in using your Ideogram credentials. Free accounts are sufficient for most features, but paid accounts enable advanced options like background removal and high-quality PNG downloads.
Step 4: Configure images and prompts.
- Image Setup:
- If using image templates, click “Select Design” to choose files.
- Multiple images can be selected for batch creation.
- Magic Prompt:
- Choose AUTO for automatic prompt optimization or enter custom prompts manually.
Step 5: Customize Ideogram parameters.
- Aspect Ratio:
- Image ratios:
- 1:1: Square (ideal for t-shirts, mugs).
- 16:9: Landscape (ideal for posters).
- Image ratios:
- Image Weight:
- Adjust the balance between source images and prompts (values range from 1-100; recommended: 70).
- Visibility:
- Public: Share designs publicly.
- Private: Keep designs private.
7. Starting the Design Process
Step 1: Log in to ChatGPT or Ideogram.
- For ChatGPT, click “Open” in the ChatGPT profile configuration and log in with your ChatGPT-4 account.
- For Ideogram, click “Open” to log in to your Ideogram account.
Step 2: Start the process.
- Click “Start” to begin design generation.
- To pause, click “Stop.”
Step 3: Review results.
- Generated designs will be saved automatically in the selected folder.
- Browse and edit as needed.
8. Tips for Optimization
- Combine prompts and images:
- Use detailed prompts alongside image templates for quick and unique designs.
- Optimize prompts:
- Update prompts based on market trends.
- Use specific and clear language.
- Choose the right account:
- Free Ideogram accounts suffice for basic needs, but paid accounts enhance quality and efficiency.
- Set reasonable wait times:
- Avoid overloading ChatGPT or Ideogram by configuring appropriate delays.
9. FAQs
- Is there a limit to the number of designs PODGenie can generate?
- No, you can generate unlimited designs as long as the system is running continuously.
- Can I use PODGenie on Mac?
- PODGenie is currently Windows-only. Mac users can use a Windows VPS to run it.
- What limitations apply to free Ideogram accounts?
- Free accounts cannot download PNG files or remove backgrounds.
10. Conclusion
PODGenie is an essential tool for POD businesses seeking to optimize design workflows and save time. Leverage both ChatGPT and Ideogram to maximize efficiency and expand your product offerings!

